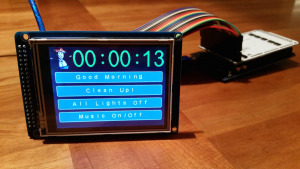
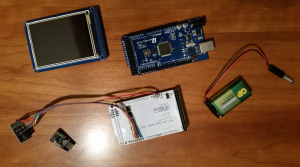
 Возможно, вы захотите, контролировать более сложные сценарии проекта домашней автоматизации, для этого очень пригодится контроллер сцен.
В этом примере мы использовали сенсорный экран для отображения сцены параметров запуска. Кнопки могут быть настроены в коде скетча с вашими предпочтениями. С небольшими усилиями вы могли бы даже изменить функции кнопок в зависимости от времени дня или создать полноценную систему меню.
Если вы предпочитаете сохранить контроллер простым, вы можете не подключать сенсорный дисплей, а просто прикрепить несколько кнопок к вашему вашего Arduino для выполнения команд сцены.
Приведенный пример также показывает время в правом верхнем углу. Если вам нужно больше места для вашей кнопки вы можете удалить эту часть.
Сенсорный экран, который используется здесь, не любят делиться SPI с радио с nrf24l01. Нам пришлось переместить радио в отдельный программный интерфейс на основе SPI . В инструкции ниже показано, куда что подключать.
Демонстрация
Данное короткое видео показывает контроллер сцен в действии.
Для проекта простого контроллера с кнопками, можете посмотреть проект petewills здесь
Подключение
Этот датчик в основном состоит из Atmega 2650, shield и дисплея, который легко защелкиваются. Единственное, что осталось вы должны подключить радио. Мы решили припаять провода на дисплей экрана, но вы сможете временно подсоедините кабели с помощью проводов DuPont во время тестирования. В 3,3В выход ATMega2650 немного с помехами, поэтому мы решили использовать понижающий регулятор от 5В->3,3В, чтобы сгладить ситуацию немного.

| AtMega 2650 | Понижающий преобразователь для радио |
|---|---|
| GND | GND |
| 5V | Step Down module VCC |
| D14(цифровой выход) | SCK |
| D15(цифровой выход) | MOSI |
| D16(цифровой выход) | MISO |
| D17(цифровой выход) | CE |
| D18(цифровой выход) | CSN |
Пример
Этот пример использует внешние библиотеки UTFT, UTouch, UTFT_Buttons и TimeLib найти их можно здесь. Пожалуйста, установите их и перезагрузите устройство Arduino IDE, прежде чем пытаться компилировать. Он также зависит от внешнего источника файлов, найденных в папке примера.
|
1 2 3 4 5 6 7 8 9 10 11 12 13 14 15 16 17 18 19 20 21 22 23 24 25 26 27 28 29 30 31 32 33 34 35 36 37 38 39 40 41 42 43 44 45 46 47 48 49 50 51 52 53 54 55 56 57 58 59 60 61 62 63 64 65 66 67 68 69 70 71 72 73 74 75 76 77 78 79 80 81 82 83 84 85 86 87 88 89 90 91 92 93 94 95 96 97 98 99 100 101 102 103 104 105 106 107 108 109 110 111 112 113 114 115 116 117 118 119 120 121 122 123 124 125 126 127 128 129 130 131 132 133 134 135 136 137 138 139 140 141 142 143 144 145 146 147 148 149 150 151 152 153 154 155 156 157 158 159 160 161 162 163 164 165 166 167 168 169 170 171 172 173 174 175 176 177 178 179 180 181 182 183 184 185 186 187 188 189 190 191 192 193 194 195 196 197 198 199 |
/** * The MySensors Arduino library handles the wireless radio link and protocol * between your home built sensors/actuators and HA controller of choice. * The sensors forms a self healing radio network with optional repeaters. Each * repeater and gateway builds a routing tables in EEPROM which keeps track of the * network topology allowing messages to be routed to nodes. * * Created by Henrik Ekblad <henrik.ekblad@mysensors.org> * Copyright (C) 2013-2015 Sensnology AB * Full contributor list: https://github.com/mysensors/Arduino/graphs/contributors * * Documentation: http://www.mysensors.org * Support Forum: http://forum.mysensors.org * * This program is free software; you can redistribute it and/or * modify it under the terms of the GNU General Public License * version 2 as published by the Free Software Foundation. * ******************************* * * REVISION HISTORY * Version 1.0 - Henrik Ekblad * * DESCRIPTION * http://www.mysensors.org/build/scene_controller * Touch Display Scene Controller build using a touch enabled tft display * attached to a ATMega 2560. This example fetches time from controller and sends * in scene commands to the controller. * Short press sends V_SCENE_ON and long press (>0.5sec) sends V_SCENE_OFF. * * Henrik Ekblad <henrik.ekblad@mysensors.org> * * This example uses: * UTFT library: http://www.henningkarlsen.com/electronics/library.php?id=51 * Convert your own images here: http://www.henningkarlsen.com/electronics/t_imageconverter565.php * * The 3v3 output on the ATMega2560 is especially bad. I had to use a step down * on the 5V output to get solid transmissions. * * * Connect radio * ---------------------------------- * Radio Arduino Pin * ---------------------------------- * GND GND * 5V -> Step down -> 3V3 (see buying guide for help finding step-down) * SCK 14 * MOSI 15 * MISO 16 * CE 17 * CSN 18 * */ // Enable debug prints to serial monitor #define MY_DEBUG // Enable soft spi as radio has a hard time sharing spi #define MY_SOFTSPI // Enable and select radio type attached #define MY_RADIO_RF24 //#define MY_RADIO_RFM69 #include <TimeLib.h> #include <SPI.h> #include <MySensors.h> #include <stdarg.h> #include <UTFT.h> #include <UTouch.h> #include <UTFT_Buttons.h> #include <avr/pgmspace.h> #include "arial_bold.c" #include "ArialNumFontPlus.c" #include "logo.c" #define CHILD_ID 1 int LONG_PRESS = 500; // Number of millisecons to trinnger scene off for button push int RESEND_DEBOUNCE = 2000; // Number of millisecons interval between sending of same // scene number again. // This is used to avoid unwanted re-trigger when using // a sensetive touch diplay. // Add your buttons here. Max is 5 if you still want time at the top. char *buttons[] = { (char *)"Good Morning", (char *)"Clean Up!", (char *)"All Lights Off", (char *)"Music On/Off" }; const int buttonCount = sizeof(buttons)/sizeof(char *); const int padding = 10; const int topBarHeight = 60; MyMessage on(CHILD_ID, V_SCENE_ON); MyMessage off(CHILD_ID, V_SCENE_OFF); UTFT myGLCD(ITDB32S,38,39,40,41); UTouch myTouch( 6, 5, 4, 3, 2); UTFT_Buttons myButtons(&myGLCD, &myTouch); bool timeReceived = false; unsigned long lastTimeUpdate=0, lastRequest=0; char timeBuf[20]; void setup() { myGLCD.InitLCD(); myGLCD.clrScr(); myGLCD.setFont((uint8_t*)ArialNumFontPlus); myGLCD.setColor(100, 255, 100); myGLCD.setBackColor(0, 0, 0); myGLCD.drawBitmap (0, 0, 60, 60, (unsigned int*)logo); myTouch.InitTouch(); myTouch.setPrecision(PREC_MEDIUM); myButtons.setButtonColors(VGA_WHITE, VGA_GRAY, VGA_WHITE, VGA_RED, VGA_BLUE); myButtons.setTextFont((uint8_t*)arial_bold); int height = (myGLCD.getDisplayYSize()-topBarHeight-(padding*(buttonCount+2)))/buttonCount; // Add buttons for (int i=0; i<buttonCount;i++) { int y = topBarHeight + padding+(i*(height+padding)); myButtons.addButton( padding, y, myGLCD.getDisplayXSize()-padding*2, height, buttons[i]); } myButtons.drawButtons(); // Request time from controller. requestTime(); } void presentation() { // Send the sketch version information to the gateway and Controller sendSketchInfo("Scene Ctrl", "1.0"); present(CHILD_ID, S_SCENE_CONTROLLER); } int lastPressedButton = -1; unsigned long lastPressedButtonTime = 0; void loop() { unsigned long now = millis(); if (myTouch.dataAvailable()) { int pressedButton = myButtons.checkButtons(); if (pressedButton>=0) { bool longPress = millis()-now>(unsigned long)LONG_PRESS; if (pressedButton != lastPressedButton || now-lastPressedButtonTime > (unsigned long)RESEND_DEBOUNCE) { if (longPress) { send(off.set(pressedButton)); Serial.print("Long pressed: "); } else { send(on.set(pressedButton)); Serial.print("Pressed: "); } Serial.println(pressedButton); lastPressedButton = pressedButton; lastPressedButtonTime=now; } } } // If no time has been received yet, request it every 10 second from controller // When time has been received, request update every hour if ((!timeReceived && now-lastRequest > (unsigned long)10*1000) || (timeReceived && now-lastRequest > (unsigned long)60*1000*60)) { // Request time from controller. Serial.println("requesting time"); requestTime(); lastRequest = now; } // Update time every second if (timeReceived && now-lastTimeUpdate > 1000) { printTime(); lastTimeUpdate = now; } } // This is called when a new time value was received void receiveTime(unsigned long time) { // Ok, set incoming time setTime(time); timeReceived = true; } void printTime() { sprintf(timeBuf, "%02d:%02d:%02d", hour(), minute(), second()); myGLCD.print(timeBuf, 60,7); } |
Перевёл Антон Вотчицев