
Это простой, но очень полезный пример эскиза для бинарных датчиков; Открытые / закрытые двери или состояние настенного выключателя.
Плата Arduino Pro Mini имеет 13 независимых цифровых входов, которые могут использоваться, чтобы определять состояние открытия / закрытия.
Включив внутренний подтягивающий резистор (смотри как сделали в данном примере), вам не нужен внешний подтягивающий резистор. Просто подключите кнопку или геркон между GND и одним из 13 независимых цифровых входов.
Эскиз также использует библиотеку Debounce для фильтрации ложных срабатываний.
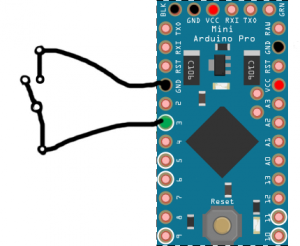
Подключение
Начните с подключения радиомодуля.
| Датчик | Arduino | Комментарий | 
| Кнопка | GND | Чёрный | 
| Кнопка | D3 | Зелёный | 
Примеры
В этом примере используется внешняя библиотека Bounce2, найденная здесь. Пожалуйста, установите его и перезапустите среду разработки Arduino перед тем, как компилировать.
| 
					 1 2 3 4 5 6 7 8 9 10 11 12 13 14 15 16 17 18 19 20 21 22 23 24 25 26 27 28 29 30 31 32 33 34 35 36 37 38 39 40 41 42 43 44 45 46 47 48 49 50 51 52 53 54 55 56 57 58 59 60 61 62 63 64 65 66 67 68 69 70 71 72 73 74 75 76 77 78 79 80 81 82  | 
						/**  * The MySensors Arduino library handles the wireless radio link and protocol  * between your home built sensors/actuators and HA controller of choice.  * The sensors forms a self healing radio network with optional repeaters. Each  * repeater and gateway builds a routing tables in EEPROM which keeps track of the  * network topology allowing messages to be routed to nodes.  *  * Created by Henrik Ekblad <henrik.ekblad@mysensors.org>  * Copyright (C) 2013-2015 Sensnology AB  * Full contributor list: https://github.com/mysensors/Arduino/graphs/contributors  *  * Documentation: http://www.mysensors.org  * Support Forum: http://forum.mysensors.org  *  * This program is free software; you can redistribute it and/or  * modify it under the terms of the GNU General Public License  * version 2 as published by the Free Software Foundation.  *  *******************************  *  * DESCRIPTION  *  * Simple binary switch example   * Connect button or door/window reed switch between   * digitial I/O pin 3 (BUTTON_PIN below) and GND.  * http://www.mysensors.org/build/binary  */ // Enable debug prints to serial monitor #define MY_DEBUG  // Enable and select radio type attached #define MY_RADIO_RF24 //#define MY_RADIO_RFM69 #include <MySensors.h> #include <Bounce2.h> #define CHILD_ID 3 #define BUTTON_PIN  3  // Arduino Digital I/O pin for button/reed switch Bounce debouncer = Bounce();  int oldValue=-1; // Change to V_LIGHT if you use S_LIGHT in presentation below MyMessage msg(CHILD_ID,V_TRIPPED); void setup()   {     // Setup the button   pinMode(BUTTON_PIN,INPUT);   // Activate internal pull-up   digitalWrite(BUTTON_PIN,HIGH);   // After setting up the button, setup debouncer   debouncer.attach(BUTTON_PIN);   debouncer.interval(5); } void presentation() {   // Register binary input sensor to gw (they will be created as child devices)   // You can use S_DOOR, S_MOTION or S_LIGHT here depending on your usage.    // If S_LIGHT is used, remember to update variable type you send in. See "msg" above.   present(CHILD_ID, S_DOOR);   } //  Check if digital input has changed and send in new value void loop()  {   debouncer.update();   // Get the update value   int value = debouncer.read();   if (value != oldValue) {      // Send in the new value      send(msg.set(value==HIGH ? 1 : 0));      oldValue = value;   } }   |